
Advice and inspiration
Embossing on bags – how to prepare the file and what the matrix looks like
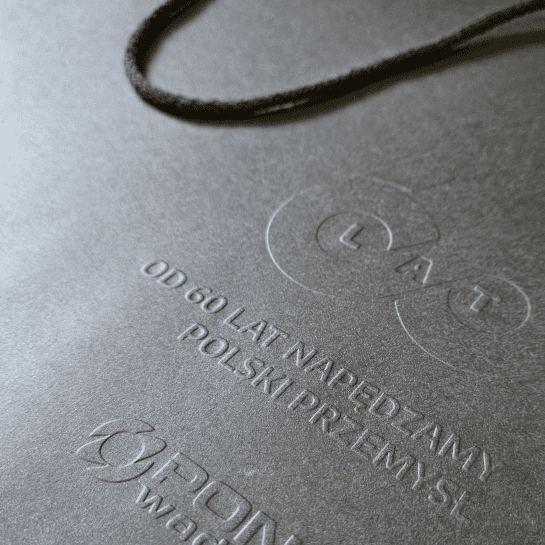
Expert guide for designers and orderers of premium bags: file requirements, technological limitations, die parameters and pre-production checklist.
Table of Contents
- Introduction: when to emboss, when to deboss?
- Preparing the file for embossing (emboss/deboss)
- Matrix and male: materials, parameters, selection
- Production workflow: proof, corrections, approval
- The most common mistakes and how to avoid them
- Checklists for project and order
- FAQ: practice questions
- Summary
Introduction: when to emboss, when to deboss?
Emboss (raised embossing) raises the element above the surface of the bag; Deboss (recessed embossing) sinks it into the paper's structure. In practice:
- Emboss – when you want to emphasize a logo, emblem, initials; gives a "tactile" prestige, great for laminated bags i premium kraft bags.
- Deboss – when you care about a "halftone" elegance, subtle play of light, often combined with hot-stamping (gold/silver) or raised varnish.
The choice depends on: paper weight and type, element surface, quantity and budget. On thin paper, large, deep embossing areas can cause deformation – in that case consider Deboss or reducing the depth/area. See available standard formats paper bags.

Preparing the file for embossing (emboss/deboss)
Layer formats and structure
- Format: preferred PDF/X-3; acceptable AI/EPS (all embedded).
- Dedicated layer: create a separate layer named EMBOSS or DEBOSS; elements only 100% K (black), without tonal transitions.
- Separation: if you combine with convex varnish/foil – use separate layers and clear names (e.g. FOIL_GOLD, UV_RAISED).
Vectors, fonts, minimum weights
- Vectors – mandatory. Do not use bitmaps for the embossing outline.
- Fonts – convert to curves; minimum letter height: ~10 pt.
- Minimum line width: practically ≥ 0.5 mm (for brass ~0.3 mm is possible, but the risk of losing the detail increases).
- Spacing: save ≥ 0.5–0.7 mm between adjacent stamping lines.
Bleeds, margins, gluing reserves
- Bleed: 3–5 mm (depending on the bag cutting and creasing technology).
- Safety margin: min. 5 mm from the edge and from the gluing/creasing line – you will avoid cracks and embossing.
- Components on the handles: avoid embossing in the hole/sewing area – these are the places most mechanically stressed.

Technological markings (depth, direction)
In the additional technical note attached to the file, indicate:
- type: EMBOSS (convex) or DEBOSS (deep),
- target depth (typically 0.8–1.2 mm for papers 170–250 g/m²),
- do you predict register with foil/hot-stamp/UV,
- file naming (e.g. project_name_EMBOSS_v1.pdf).
Matrix and male: materials, parameters, selection
Materials
- Magnesium – economical, good for short/medium runs, moderate detail.
- Brass – precision and durability, recommended for details, large volumes and foil registers.
- Steel – less often in bags; very durable even under extreme conditions.
- Polymer/rubber – tests, short series, gentler "touch"; lower tool cost.
Key parameters
- Depth: 0.8–1.2 mm (170–250 g/m² paper); more for thicker cardboard.
- Wall angle: affects the "sharpness" of edges; brass allows for steeper walls.
- Contact surface: the larger it is, the greater the risk of rippling – use breaks/sweeps.
- Register with hot-stamp/UV: prefer brass; holds position and detail more easily.

Production workflow: proof, corrections, approval
- File verification – the printing house checks layers, minimum thicknesses, gluing zones.
- Tool execution – preparation of matrix/male according to vector file.
- Proof – physical sample or mock-up close to production (paper/laminate as in the target bag).
- Correction – possible shallowing of the countersink, increasing the spacing, changing the matrix material (e.g. magnesium → brass).
- Accept – confirmation of "OK for production" and start of actual pressing.
When combining stamping with hot-stamping the order of processes and the setting of the registry are important. Most often: embossing in a register with foil or vice versa – depending on the machinery and the visual effect.
The most common mistakes and how to avoid them
- Gradients/shadows in embossing layer – the relief reproduces only the shape of the vector; remove tonality.
- Details too fine – below 0.5 mm the lines disappear; in small logos, simplify the geometry.
- Embossing in the creasing/gluing zone – may crack; keep buffer min. 5mm.
- Large full fields – wave risk; use "islands"/relief nets.
- No proof – the final effect may be different than the render; proof saves costly corrections.
Checklists for project and order
Before sending the file
- Separate layer EMBOSS/DEBOSS, 100% K elements, vectors.
- Texts converted to curves; min. 10 pt, lines ≥ 0.5 mm.
- Bleeds 3–5 mm, margins 5 mm (also from the gluing lines/handles).
- Technical note: type, depth, register with other refinements.
- File names readable, e.g. brand_torba_EMBOSS_v3.pdf.
Before production starts
- Proof accepted (paper/laminate as in production).
- Matrix parameters confirmed (material, depth, angle).
- Agreed sequence of processes (embossing vs. hot-stamp/UV).
FAQ: practice questions
Is it possible to combine embossing with hot foil?
Yes, this is a common practice in premium bags. Brass matrices and precise registration are recommended. Foil first, then embossing, or vice versa – it depends on the machine technology.
What depth should be chosen?
For papers 170–250 g/m² usually 0.8–1.2 mm. Greater depth increases the risk of deformation – test on a proof.
What about very fine details in the logo?
Simplify the geometry (letter-spacing, bolding), consider brass. Details <0.5 mm are risky.
Does emboss/deboss increase cost?
Yes – there is the cost of the tool (matrix/die) and setup time. For repeatable series, the tool can be reused (savings in subsequent reprints).
Summary
Embossing/debossing gives bags a distinct premium effect. Success depends on correct file preparation (vectors, dedicated layer, technological allowances) and the proper selection of the tool (die material, depth, wall angle). Always plan a proof, especially when combining multiple finishing techniques. A well-prepared design translates into a consistent aesthetic effect and predictable production.